Pages

Showing posts with label Menu. Show all posts

Saturday, January 25, 2014

Chocolate Banana Tortilla

I've done a lot to give up sugar since last September. I've cut out many of the foods that once regularly inhabited my fridge. I don't go for ice cream runs when I'm feeling sad or stressed. And I have wandered up and down the aisles of whole foods stocking my cart with healthier snack alternatives. 

The hardest part of this? Chocolate. 

I have substituted organic dark chocolate bars or dark chocolate covered pretzels that I love. They are a huge help when I'm craving a little taste of chocolate. And there is so little sugar in them! The fact that I'm seeing results from these changes do help to keep me motivated. It's hard to believe that I used to get headaches nearly daily, when I hardly ever get them now! I credit part of that to the diet changes. It has taken some creativity however!

One of my favorite snacks lately has been whole wheat tortillas with banana, nutella, and oats. I know what you are thinking- how did nutella make the list of OK foods? 

Here's the trick: Take just a small teaspoon full of it and spread it as thinly as possible over half of a whole wheat tortilla. Add banana slices and sprinkle some oats, then fold it in half and warm over medium heat for a minute or so on each side. The small amount of nutella will fill the entire tortilla with warm gooey chocolate deliciousness! And one teaspoon has about 5grams of sugar. I usually split this snack with my husband, so it's not very substantial at all. Hooray for loopholes! 

So, to summarize: 
1/2 a banana
1 tsp. nutella
Whole oats
1 whole wheat tortilla shell

Spread the ingredients over 1/2 of the tortilla and fold in half. Cook over medium heat for about 1 minute on each side or until shell is warm and nutella well melted. Do not overcook!

Enjoy!
Before being warmed up! Yum! 

Thursday, January 16, 2014

Easy Lemon Chicken

Maybe it's because of the cold weather, but I wanted a bright and cheery dish to be my next new recipe. Lemons are bright and cheery, so Lemon Chicken was the winner!

I looked through a lot of recipes online and, per usual, combined the parts that I liked about them to come up with this recipe. Information came from allrecipes.com. 

Here's what you need: 
1. Three thin chicken breasts
2. 1 Lemon
3. 1/4 cup Lemon Juice
4. 1 Tbs. Olive Oil
5. 2/3 cup Chicken Broth
6. Salt and Pepper
7. Flour
8. Parsley

Okay, first you'll need to throw some flour, salt and pepper into a bowl (just enough to coast each chicken breast thoroughly). Next, heat the olive oil on medium high heat, and cook the chicken 3-5 minutes on each side or until cooked through (my stove isn't great so it took me longer than this). Remove the chicken and place on a serving platter. 

Using the same pan, add the lemon juice and chicken broth and cook several minutes until slightly reduced. Stir in a couple of shakes of parsley. Pour over the chicken. 

Garnish the chicken with thin slices of lemon and a sprinkle of parsley and you're ready to go! Enjoy!


Monday, December 23, 2013

Crockpot Orange Chicken

Yet another crockpot recipe to share! This one came from Pinterest (via: thefrugalgirls.com), and it was quite simple. We really like orange chicken, but getting Chinese takeout on a regular basis is just not a healthy option. This recipe really approximates the taste of orange chicken, but comes from a crockpot, which is really amazing.

All you need is:

4-5 Boneless skinless chicken breasts
3/4 cup of Smuckers Sweet Orange Marmalade
3/4 cup of Sweet Baby Ray's original BBQ sauce
2 tbsp. Soy Sauce

Put the chicken in all by itself and cookout on high for three hours. It will cook in its own juices- don't worry! I did spray the crockpot with PAM first just to be safe.

After three hours drain the juices from the crockpot. Mix the orange marmalade, BBQ sauce and soy sauce together and then pour it over the chicken. Cook on high for another 30 minutes.

We served it over brown rice and with broccoli. We will definitely be repeating this recipe!

Friday, December 13, 2013

Healthy Breakfast Casserole for 2

We tend to eat a lot of egg dishes at our house. Since we don't eat red meat, and turkey and chicken can get boring, we use eggs as a source of protein.

I've made all sorts of omelettes, frittatas, and scramblers, but nothing compares to a good breakfast casserole. I started from a standard recipe to make my own healthy version that we never have leftovers from. This recipe also works with the real foods diet! =)

Ingredients:
4 eggs
1 cup Horizon Organic Non-Fat Milk
1/2 lb Lean ground turkey
1 can organic sliced mushrooms
1 cup bread, cut into cubes (I buy from the Whole Foods' bakery)
Horizon Organic Shredded Cheddar Cheese
Salt & Pepper

Directions:

1. Preheat oven to 350F. Grease an 8X8 baking dish.
2. Brown the turkey. Place in bottom of the baking dish.
3. In the dish, layer the mushrooms first, then the cubed bread.
3. In a medium bowl, combine eggs, milk, and a dash of salt and pepper.
4. Pour egg mixture over the other ingredients in the baking dish.
5. Sprinkle with shredded cheese.
6. Bake for 30 minutes or until top is puffy.

Enjoy!


Wednesday, September 4, 2013

The School Year Resolution

Though we have just settled into September, everyone seems to be noticing glimpses of fall. We are starting to have some cooler days. The kids have gone back to school. Starbucks is now offering their Pumpkin Spice Lattes and Fraps. It's basically here!

Another way that I can sense the return of fall is my renewed desire for self-improvement. The New Year is perhaps the most popular time to set goals and make changes, but for me, there is nothing like a New School Year Resolution! As a kid, it was the chance to make new friends, buy fresh notebooks, and geek out over new classes with new things to learn. As a teacher, it offered the chance to try out new lesson plans, get to know a new group of (what I labeled) future French lovers, and hit up the Loft for clearance dresses. And being a grad student only combined all this! 

Now that Labor Day has come and gone, I feel as though I can really focus on my School Year Resolution for this fall: Eating healthy, and specifically, cutting down on my sugar intake. 

I'm using two specific apps on my iPhone, "Map My Run" and "My Fitness Pal" to monitor my exercise and eating. Though it's only been a couple of days, I'm already enjoying the process. Map My Run (or Walk) uses GPS technology. I turn it on, put my cell phone in my pocket, and when I'm done exercising the route that I took is mapped out for me, along with my distance, average speed, and calories burned. Then I use My Fitness Pal to keep track of what I eat. It breaks down for me exactly where I'm lacking, and what I might want to cut down on. I think it's really convinced me to start taking vitamins, because I seem to have a real deficit there. (See Myfitnesspal.com or mapmyrun.com for more information!).

Last night was to be Taco Tuesday, a favorite at our house. Instead of scrapping the whole thing, I decided I'd try a healthy twist on it by simply replacing the shells with Romaine lettuce hearts. It was actually really tasty, and neither of us felt too full at the end of the meal! The best part is that, after inputting all of the information into the My Fitness Pal app, it gave me the nutritional information for the meal, which I will share with you here! All items were purchased at Whole Foods. 

Chicken Taco Lettuce Wraps

FreeBird Chicken Breast Strips (1 box)
Old El Paso Taco Seasoning, 1 tsp.
Romaine Hearts
1 tomato, diced 
Horizon Organic Finely Shredded Mexican Cheese, 1/2 cup
Lite Sour Cream

The chicken is already fully cooked, but I wanted it hot so I poured a little olive oil in a pan, added the taco seasoning, and cooked the chicken in that until it was hot and well seasoned. I made four "tacos" for each of us, with some cheese, tomato, and a bit of sour cream, and distributed the chicken evenly. Each taco is about 100 calories, about 3.5 grams of fat, and about 12 grams of protein. 

I'll keep sharing any recipes we enjoy! Happy Fall Y'all! 

Friday, August 2, 2013

Raspberry Tuna Salad Stuffed Tomatoes

For a seriously simple appetizer (or even as a light meal), I like to make these tasty tuna bites. The idea came (as usual) from me trying to use up whatever I had available in order to avoid grocery shopping for one more day. The result became one of my favorite quick recipes and works well pretty much any time of day.

Here is what you need: 

1 package chunk light tuna
Miracle Whip
1 cucumber, thinly diced
(Optional: Walnuts, crushed)
2 tomatoes. 
Newman's Own Raspberry Vinaigrette


Here's what you'll do: 

Empty tuna (if it's from the package it should already be drained) into a small mixing bowl and add about a tablespoon of miracle whip (or mayonnaise, based on your preference). Stir in the cucumber and nuts (if desired; I am allergic to walnuts but know many people like including it). Add in two tablespoons of the raspberry vinaigrette; stir. 

I love how crunchy that cucumber looks!!
From here you have two options: 
1) Slice the tomatoes in half and hollow them. Pour tuna mixture in and serve as stuffed tomatoes. 

2) Slice the tomatoes completely across and top each tomato slice with a smaller amount of the tuna salad. This is a better option for appetizers. 

Top with shredded cheddar cheese and enjoy! 

Tuesday, July 23, 2013

Crockpot Salsa Chicken

How I love three ingredient meals!

Time for another incredibly easy but very tasty recipe, inspired by lazy day cooking!

What you need:

  • 3-4 Boneless skinless chicken breasts
  • 1 can salsa
  • 1 package taco seasoning


Throw everything together in the slow cooker. Cook on low for 6 hours, or on high for 4. When there's about an hour remaining, pull the chicken and then let it continue to cook. You can make tacos from it, or as we prefer, top with shredded cheese and sour cream and enjoy! Easiest dinner ever! The only hard part is being home and smelling the deliciousness cooking all day without eating it!

Monday, June 24, 2013

Veggie Frittatas for Two

Happy Meatless Monday, once again! Tonight I'm making one of my favorite protein-filled vegetarian dishes. It's basically a very light omelette; good for lazy days and those days when you don't have much left in the refrigerator. I make this a lot when I have guests because I can stick two or three in the oven at once with different ingredients. When it's just the two of us (which is most of the time), I will usually just make one and have some side dishes, but occasionally we'll split two. Anyway...

What you need:
3 eggs
1/2 c. milk
Cut up vegetables
Shredded cheese
Salt and pepper, to taste

Beat together eggs, milk, salt and pepper. Pour into greased 8X8 round baking dish. Add any other desired ingredients. Bake 25-30 minutes at 350.

C'est simple!
Two pies! One is tomato & cheddar, the other broccoli & swiss!

It's great to have options!

Monday, June 3, 2013

Greek Veggie Burgers

Meatless Monday again! The other night I needed a quick and portable dinner for us, since I had to work late and my husband would be meeting me on campus. I decided to go with these Greek Boca Burgers, a family favorite since I was in high school. I think the original recipe came from Kraft Foods, but it's been altered so many times that I'm not sure where it stands now. Here's how I fixed it tonight:

Ingredients (for two people):
1/2 cucumber, chopped into small cubes
Tomato, sliced
Two pita pockets
Vegan Veggie Burgers
2 heaping teaspoons, sour cream
Garlic powder
Feta cheese

1. Cook the veggie burgers in olive oil until thoroughly cooked and, as I like it, a little crunchy. About five minutes each side over medium heat.

2. In a small bowl combine sour cream and cucumber. Sprinkle in garlic powder and mix together. This is basically a simplified tzatziki sauce.

3. Fill the pita pocket with sour cream mixture, tomato slices, and the veggie burger (easier if you cut it in half). Top with feta cheese if desired.

I have to say, refrigerating them for a few hours while I taught the evening class didn't hurt the taste. In fact, we kind of liked how the sauce soaked into the bread. Of course the intent is to eat them right away, but it's nice to know that these could be a substitute for PB&J on picnics! Enjoy! :-)


Thursday, April 25, 2013

Easy Swiss Crepes

Today I'm feeling inspired to post something French. I took a short break from posting to defend my Masters Thesis- but now that I've successfully completed that it definitely feels like time to celebrate! And what better way to celebrate the near completion of my MA in French than some crepes?

What I really like about this recipe is that Joe and I make it together. And it is super easy to make! I found the recipe for the crepe batter using my Dinner Spinner App!

Ingredients:
Gruyere cheese
1/2 c. chopped chicken
1 can mushroom pieces

For the crepes:
2 eggs
1 c. milk
2/3 c. all purpose flour
1 pinch salt
1-1/2 teaspoons vegetable oil

1. Combine all ingredients for the crepes in blender until smooth. Cover and refrigerate  1 hour.
2. Heat a skillet over medium-high heat and brush with oil. Pour 1/4 cup of crepe batter into the pan, tilting to completely coat the surface of the pan. Cook 2-5 minutes, turning once, until golden. Repeat with remaining batter.

3. Spread cheese over inside of crepe. Fill with chicken and mushrooms. Roll up and enjoy!


Monday, March 25, 2013

Bonus: Prohibition Brownie Sundaes

As I mentioned in my post on throwing a centuries party, we ended our night by indulging in Prohibition Brownie Sundaes. Here's how to make them:

What you'll need:
1. One box of brownie mix (which may also require vegetable oil, water, and/or eggs). I prefer Betty Crocker Deluxe Fudge!
2. Vanilla Ice Cream
3. Raspberries

For the chocolate sauce:
1. 1 cup unsweetened cocoa powder
2. 1 cup granulated sugar
3. 1 cup cold water
4. 1/2 t. salt
5. 1 T vanilla extract

Step 1: Make the brownies. While they are in the oven, move on to step two.
Step 2: In a mixing bowl, combine the cocoa powder and sugar until well blended. Then add in the water and 1/4 teaspoon of salt.
Step 3: Pour into saucepan and stir constantly on medium heat until the mixture comes to a boil.
Step 4: Continue boiling, about 3-4 minutes. The mixture will begin to thicken, but will not thicken entirely until cool.
Step 5: Taste and add up to 1/4 teaspoon more of salt, if needed.
Step 6: Remove from heat and stir in vanilla. Let cool.
Step 7: Cut brownies and serve them in martini glasses. Top with ice cream, chocolate sauce, and raspberries.

These are so delicious they should've been banned under prohibition, but if you want to get more into the 'spirit' of prohibition, I'm told you can sir in 1-2 tablespoons of dark rum into the sauce. Either way, we'll never tell. =)

How to throw a centuries party!

For my 25th birthday last fall, I decided to throw myself one last party (figuring I'll probably not have another one until thirty because, honestly, ain't nobody got time for that). I wanted to do something really unique and different and ended up focusing on the number 25. I immediately thought of the 1920s as a theme, and from that the idea of a centuries party was born!

What is a centuries party?
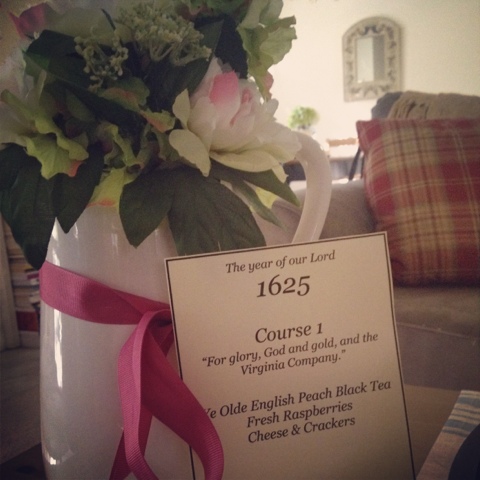
A centuries party is a dinner party where each course jumps a century. Mine started in 1625 with tea, crackers and cookies. The second course was in 1725- vegetable soup and cornbread. Our next stop was the main course, an 1825 platter of sliced turkey and root vegetables (and birch beer to drink!). We ended the night with Prohibition Brownie Sundaes, a 1925 treat served in martini glasses!

How do I know what to serve?
A simple google search made it easy to find typical colonial dishes. The key is to prepare as much as possible in advance so you can heat up the next course in the oven or crock pot and have smooth transitions.

How else can I set the mood for the century?
Music! My husband created a playlist on YouTube with songs from each century. He also timed it so the music would let us know when we needed to move to a new century. We also changed rooms with the passage of time. Tea was served in the living room, the next two courses in the dining room, then back to the living room for jazz dancing and dessert.
We also created menu cards with famous quotes from the time. Lastly, I switched out the tableware for each century. Dainty tea cups, pewter pitches and platters, tinted blue martini glasses (from the Dollar Tree!) helped change the setting.

For the history nerd in me, this was the perfect theme party! Way better than just going out to a restaurant!

Menu Cards for each century.


1625 Tea being set up!


The main course!


Delicious sundaes in martini glasses!

Friday, March 22, 2013

Macaroni & Cheese (oven or microwave!)

One of my best friends just finished a deployment in Afghanistan and, no longer having cafeteria food to rely on, emailed me for some quick and easy recipes that even he could manage. Since we are both from the south, I decided to email him some basic southern recipes. I have been obsessed with Macaroni and Cheese since childhood, and immediately thought of this recipe. He made it in his German oven two nights ago and proudly informed me that he was able to pull it off and that it was delicious! I shared with him that there's a short-cut microwave version as well. So, here they both are, for your enjoyment!


Oven Baked Macaroni & Cheese
1 cup shells, cooked
1/3 c. milk
1/3 c. sour cream
1 c. shredded cheese
Pinch of salt & pepper

Mix everything together, pour into in a greased 8X8 baking dish and cook for 20-25 minutes at 325F. Serves 2-4.

So easy! And delicious. I often will add things to it (like ground turkey, or tomatoes) to make it a bit heartier. And since it's a common lunch choice for me, I adapted the recipe to create a similar taste from the microwave!

Okay, the first step is to cook a box of shells and keep them in the fridge so you can make quick meals like this. My roommates and I learned this in college, and it has since saved me on mornings when we are running late and hubby needs a lunch.

Add a cup of pasta to a microwave safe dish. Stir in a heaping tablespoon of sour cream and cover with shredded cheddar cheese. Mix together and add salt and pepper to taste. Microwave on high one minute, stir. If more time needed, continue in thirty second increments, stirring after. VoilĂ ! Tasty mac'n'cheese for a lazy day!


Monday, March 18, 2013

Pineapple Boca Burgers

Happy Meatless Monday! I'm not sure how you feel about veggie burgers, but for me they don't taste good enough on their own- certainly not enough to replace a real burger- and require a bit of seasoning. I find myself trying to mask the veggie taste while also making them a bit crunchier/heartier. This recipe is my favorite one so far. The olive oil really helped to blacken the burgers, and the sweet aftertaste was delicious!

Pineapple Glazed Boca Burgers

Glaze:
1/3 c Pineapple juice
1/4 c Worcestershire Sauce
1 Tbs packed brown sugar
2-1/2 Tbs olive oil
--
4 Boca burgers
1 can sliced pineapple

Mix all ingredients together for glaze. Marinade defrosted Boca burgers in glaze for 1 hour. Cook on medium high heat about 5-8 minutes each side. Top with pineapple, place on whole wheat bun and enjoy!

Serves 4.

Enjoy!

Sunday, March 10, 2013

Open Faced Mexi-Mix Sandwiches

This recipe is great for vegetarians! Here's what you need:

Open Faced Mexi-Mix Sandwiches

-1 can low sodium pinto beans, drained
-1 c. Salsa
-1 bag instant rice
-8 oz. can diced tomatoes
-package of taco seasoning (add to taste- I only use a couple tablespoons).
-Hawaiian sweet rolls
-Shredded cheddar cheese

In medium saucepan stir together beans, salsa, taco seasoning and diced tomatoes, uncovered on low until heated through. Cook rice as directed and add to salsa/bean mixture. Cut rolls in half and top with the rice and bean mixture. Top with shredded cheese if desired.

That's it! I like that this dish is flavorful without needing all the cheese that you find in enchiladas. I also love the combination of the sweet and spicy flavors thanks to the rolls. Can be made in 15 minutes and serves about 4 (depending on whether or not my husband is there!). Enjoy!

Friday, February 22, 2013

Dinner Experiments

I've been trying to come up with new recipes lately, most of which are based on similar recipes I find online, and therefore I'm certain someone else has already discovered them. Regardless, it's been a fun process. Here's one I tried tonight that my husband just loved. I'm calling it:

Chicken Pot Pie Pockets for 2
In the making...

All you need is:
-Cooked, cut up chicken (I just boiled a chicken breast but you can also buy this precooked!)
-Mashed potatoes (half a packet of instant will do)
-Frozen peas and carrots (no need to cook these beforehand)
-Shredded cheddar cheese
-Pillsbury crescent rolls (8 count)

Roll out the crescent rolls, separating them into two halves. I reformed the dough since it is precut to be formed into the crescent triangles. Then line half of the square of dough with mashed potatoes and cover with the remaining ingredients. Fold over. Repeat with second square. Bake in oven at 350 for 12-15 minutes or until golden brown. You're left with warm, flaky deliciousness!

My husband ate his whole pocket but I could only eat half! So looks like I have lunch for tomorrow. =)

Delicious!

Tuesday, February 5, 2013

Super Bowl Party!

Ok, so we didn't really have a party. We built a fire in the fireplace and sat in front of the game until the electricity went out at the stadium. However I did have time to make these cute desserts for us! Chocolate covered strawberry footballs!


As you can see from the picture, I had no favorite team going in (though given our proximity to Baltimore, it should've been the Ravens!). I did use my favorite Mini Nestle Tollhouse chocolate chips for covering the berries and then white glitter frosting for the stitching. Needless to say, they were gone before the power came back on!